Fruity Fetish: Mexican Guava

posted on: Wednesday, February 12, 2014

I'm always enamored with the selection of fresh fruits available in California, so I'm sharing my love with you with my new series: Fruity Fetish where I'm posting snapshots of the fruits (and maybe even veggies) that's making its way into my kitchen.


Today, I'm lusting over the sweetly intoxicating scent of ripe Mexican Guavas.  They're miniature in size, but big in taste and so much more fragrant than the ones grown in my backyard.  I love my guavas with a bit of crunch, so I eat them green and unripe, skin on and all. The seeds can be a bit of a challenge (and my parents tell me it may cause constipation...yikes!) so depending on how large the seeds are, I sometimes forego them.

But here's the kicker: According to my mom, the leaves of the guava plant have medicinal purposes since they can be boiled and steeped to prepare a tea that can be used to cure digestive problems. Back in Laos, my mom's family raised pigs and every time their pigs had a bout of diarrhea, she'd boil the leaves of the guava plant and have her pigs drink the tea with the leaves and all! Apparently, it's an herbal remedy that worked amazingly well for her piglets and to this day, it's something she swears by even for us! It appears that guavas are packed full of natural antioxidants and antimicrobial agents that make it a prime herbal remedy for aiding digestive health. I love it when I can ward off my ailments with plants in our backyard. 
Mexican Guava | Guava Tea to cure Diarrhea | Fruity Fetish | via Chandara Creative
Mexican Guava | Photography via Chandara Creative


Guava Tea (for curing diarrhea)
Makes 1 pot

Ingredients 
• 1 handful fresh guava leaves, washed & coarsely chopped
• 3-4 cups water

  • Instructions:
  • 1. Boil guava leaves in water. Turn heat to low, and continue to steep guava leaves in tea for at least 30 minutes (the longer, the better). Turn off heat, strain out leaves, and drink a cup every 1.5-2 hours. 

Mocktail Monday: Sparkling Citrus Fizz for Valentine's

posted on: Monday, February 10, 2014

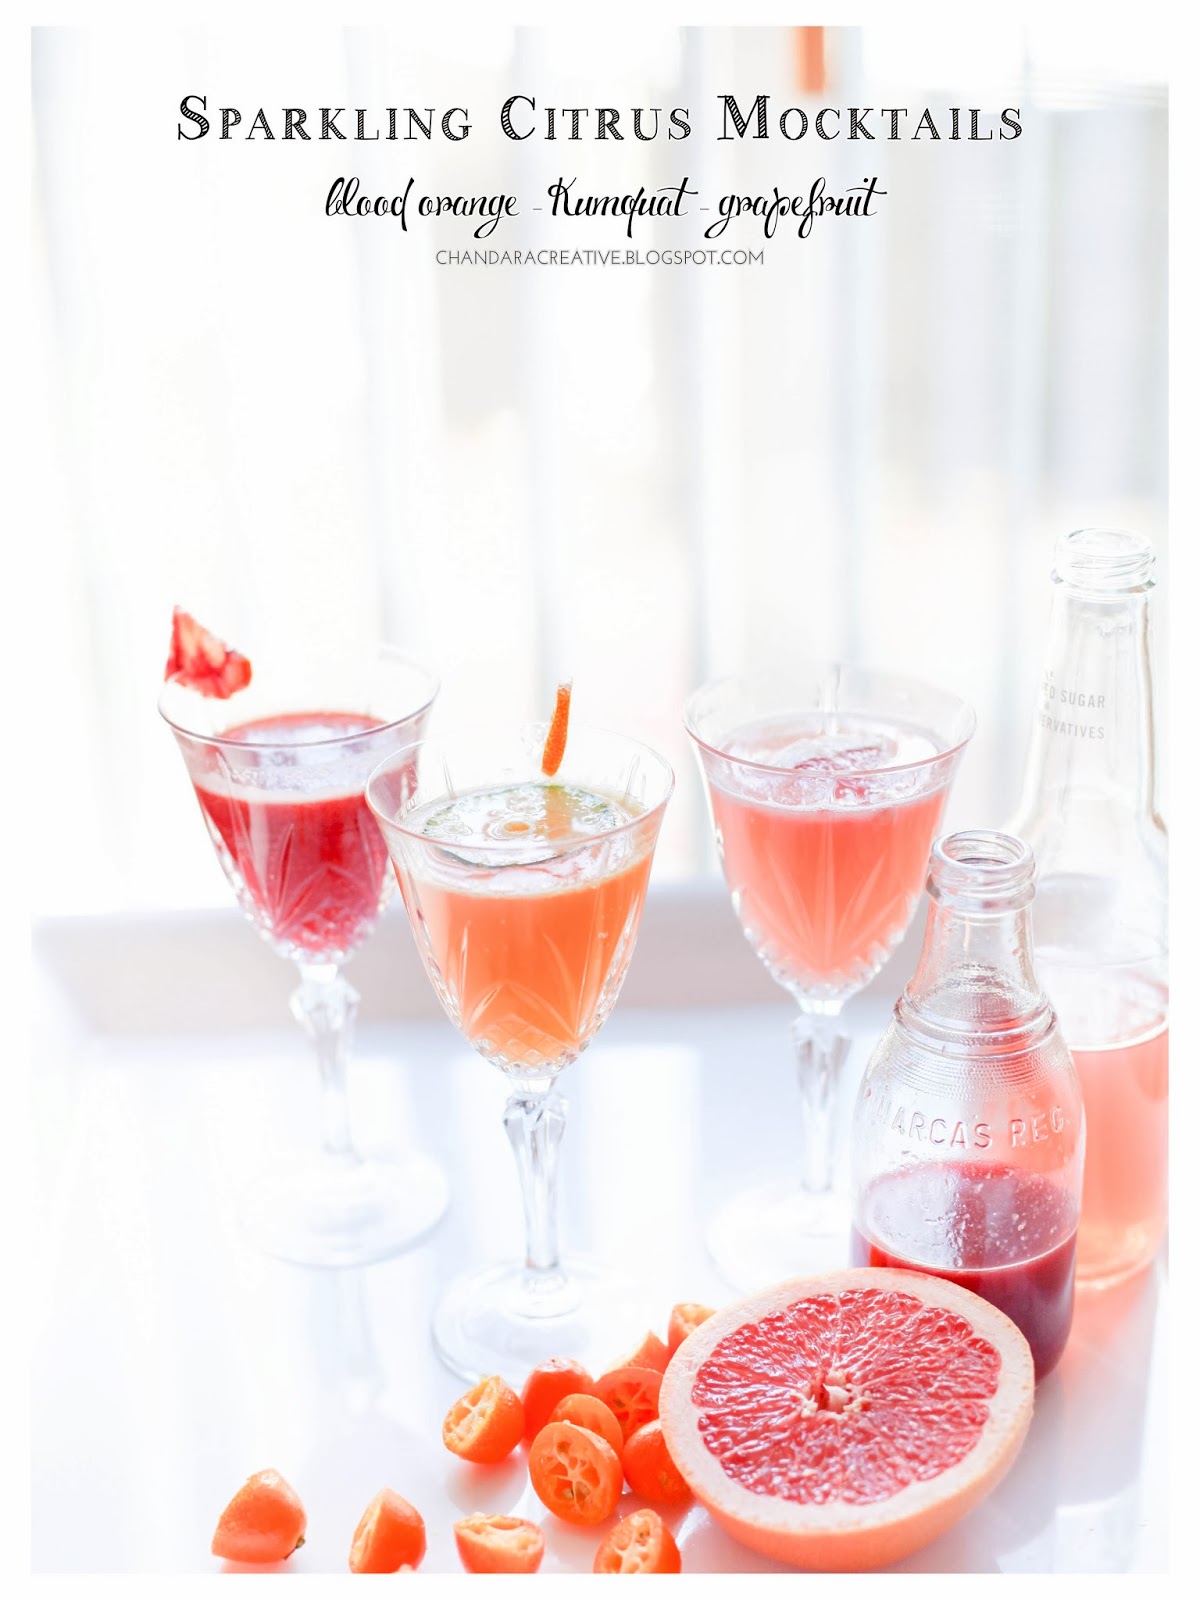
Sparkling Citrus Fizz Mocktails for Valentine's | via Chandara Creative
It seems that everywhere you look, you're bound to find an abundance of citrus gracing our winter season, and I absolutely love it! The citrus family oozes with some of my favorite color palettes from the subtle soft blush tones of pomelo and grapefruits, the warm peachy hues of kumquats, and the ruby red flesh of blood oranges, it's really a kaleidoscope of ombre deliciousness that's perfect to usher in your Valentine's celebrations.

Whether you're single or taken, Valentine's Day should simply be a day to celebrate the people you love, romantic or otherwise. During college, when the hubs and I were in the throws of a long-distance relationship, my Valentines were always my girls, and to this day, I'm so happy I have those memories to cherish. I've long believed that you should always, always surround yourself with amazing girl friends---the ones who will hold your hair when you puke, bring you tubs of ice cream when that fool breaks your heart, or simply laugh with and listen to you when you need it most.  No matter how much you love your significant other, cherish your children, or enjoy your career, you'll always need the helping hands and wittiness of smart, passionate, and inspiring girl friends to enrich your life.

In celebration of love this week, I'm featuring some simple, but refreshing citrus mocktail recipes that not only celebrate the bounty of the season, but would also be great for a cocktail (or mocktail) party. If you are opting for cocktails, I would suggest that you add in a few splashes of your favorite sparkling rosé wine or prosecco and serve it up in some lovely champagne flutes, but most importantly, make sure you toast to all the lovelies in your life. I know I will.

Grapefruit + Blood Orange | via Chandara Creative
Sparkling Grapefruit Fizz Mocktail for Valentine's | via Chandara Creative
Sparkling Grapefruit Fizz Mocktail | via Chandara Creative
Sparkling Blood Orange Fizz Mocktai for Valentine'sl | via Chandara Creative
Sparkling Blood Orange Fizz Mocktail | via Chandara Creative
Blood Orange | via Chandara Creative
Sparkling Kumquat Fizz Mocktail for Valentine's | via Chandara Creative
Sparkling Kumquat Fizz Mocktail | via Chandara Creative

Sparkling Citrus Fizz Mocktail
Adapted from Pink Grapefruit Fizz recipe via Absolut 
Serves 1

Ingredients - Sparkling Grapefruit Fizz
• 3 oz sparkling grapefruit juice, chilled
• 1.5 oz fresh squeezed citrus grapefruit juice
• 1 wedge grapefruit, thinly sliced 

Ingredients - Sparkling Blood Orange Fizz
• 3 oz sparkling blood orange juice, chilled
• 1.5 oz fresh squeezed blood orange juice
• 1 wedge blood orange, thinly sliced 


Ingredients - Sparkling Kumquat Fizz
• 3 oz sparkling grapefruit juice, chilled
• 1.5 oz (15-20) fresh squeezed kumquat juice
• 1 kumquat slice


  • Instructions:
  • 1. Fill glass with combo of sparkling & fresh citrus juice of choice, mix & stir well. Garnish with a wedge of grapefruit/blood orange/kumquat and enjoy!
  • NOTE: If you're going to turn this into a cocktail, top with 2-3 splashes of your favorite sparkling rosé wine or prosecco and serve it up in tall Champagne flutes! Cheers! 

Turkey Neck Pho Noodle Soup

posted on: Monday, February 3, 2014

In lieu of mocktails this week, I'm sharing my coveted recipe for Turkey Neck Pho to continue the celebration of Lunar New Year. Noodles have long been revered during this festive occasion to symbolize a life of longevity and prosperity. We were invited to enjoy so many amazing dishes this weekend, and noodles definitely made an appearance each time. I hope you enjoy!

Turkey Neck Pho Noodle Soup | via Chandara Creative

It's hard to realize that I've never blogged about my infatuation for Vietnamese pho because if you have ever eaten with me, you'll know just how much I love my noodle soups. Whenever there's a savory broth and some rice noodles involved, rest assured that you'll find me salivating as I hold out my bowl for seconds. This pregnancy has been a bit tough because not only does my gestational diabetes bar me from sweets, but along the same lines, I am also forced to curb my carbs which will eventually turn into sugar that cannot be absorbed by my body.  During my initial consultation with my dietitian, when others were probably getting upset over not being able to eat cookies and cakes, all I could think about was, "Wait! I have to give up my rice and pho? Awe man...this is going to drive me nuts!"  So, in lieu of rice noodles, I've managed to substitute these carbs with my glass vermicelli noodles because they're made from mung beans instead of rice, so while it's not entirely void of starch, it still contains less of it than rice. But you go ahead and knock yourself out with the real deal. I won't hold it against you.

Turkey Neck Pho Noodle Soup | via Chandara Creative

Turkey Neck Pho Noodle Soup | via Chandara Creative
Soaking your jalapeño peppers in an ice bath ensures that it's crisp when served alongside your pho

When it comes to pho, there are so many variations of this traditional Vietnamese noodle soup.  Every family has their tried and true "secret" recipe. So, what exactly is Turkey Neck Pho, you ask? Well, the recipe came to me one fine day when I was craving pho, but had no beef knuckle bones in my fridge, but simply a ziploc bag of turkey necks that I had lying around after making gravy from Thanksgiving.  It's coincidentally one of the richest, but oftentimes overlooked cuts of the turkey that you'll ever find to make pho because not only does it impart amazing umami to your broth, but it only takes up to 1.5 hours to simmer before you can produce a hearty broth versus the tedious 3+ hours it takes to really get the flavor profile from simmering beef bones for pho.  The result is a light, but extremely savory pho broth that will leave you wondering why you never thought of it for yourself.  Trust me, I had the biggest critics in my family give me the crazy eye when I first cooked this pot of pho, but since their first slurp, they haven't looked back and neither will you. 

Turkey Neck Pho Noodle Soup | via Chandara Creative
Chinese celery is smaller but much more fragrant than traditional celery, thus making it perfect for flavoring your pho broth
Turkey Neck Pho Noodle Soup | via Chandara Creative
Glass vermicelli noodles gracing my bowl alongside some rice noodles for you
Turkey Neck Pho Noodle Soup | via Chandara Creative
Turkey Neck Pho Noodle Soup | Photography via Chandara Creative


Turkey Neck Pho Noodle Soup
Serves 4-6

Ingredients - Turkey Pho Broth
• 2 large (1-2 lbs) turkey neck bones
• 1 package meat balls (your choice of pork, chicken, or beef)
• 2 chicken breasts, boneless & skinless
• 1 yellow onion, halved & charred
• 2 cinnamon sticks, toasted
• 5 whole star anise, toasted
• 5 cloves, toasted (optional)
• 3 stalks Chinese celery (may also sub with 2 stalks regular celery, chopped into 3" pieces)
• 1/4 cup fish sauce, preferably Phu Quoc "Flying Lion" brand, adjust according to taste
• 1 oz rock sugar
• 3 slices ginger root, charred
• 2 tbs salt, adjust according to taste
• 6 quarts water + 2 cups for prepping pho noodles

Ingredients - Pho Condiments
• 1 lime, sliced into wedges
• 5 sprigs fresh Thai basil
• 2 handful fresh bean sprouts
• 1 jalapeño or 1-2 Thai bird chills, thinly sliced & soaked in ice bath for 10 minutes to retain crispness
• 1/2 bunch cilantro, chopped
• 1/2 bunch green onions or scallions, chopped
• 2 packages (about 2 lbs) pho rice noodles (fresh or dry)
• Sriracha sauce
• Hoison sauce
• Optional:  Fried garlic slices, hot chili oil, chili sambal, crushed peanuts, fish sauce, black pepper

  • Instructions:
  • 1. Prepare the Aromatics:  Begin by charring the onions & ginger over an open flame, and lightly toasting the cloves, star anise, and cinnamon sticks in a pan.  Also wash your celery stalks and cut into 3" lengths. This will serve as the base that will perfume your broth. 
  • 2. Cook the Broth:  Fill a large stock pot with water, fish sauce, rock sugar, salt, aromatics, turkey neck bones, and chicken breast and allow to boil over high heat. Once broth is boiling, lower to medium low heat and allow pot to simmer for 1.5-2 hours, or until neck bones are fully cooked. Chicken breasts will cook within 40-45 minutes, so once cooked, remove from pot and allow to cool before shredding into bit-sized pieces. After removing chicken breasts, place meat balls in the pot and allow to cook for 15 minutes.  After which, you can simmer the meat balls in the broth.
  • NOTE:  Unlike traditional pho beef broth which requires parboiling to remove the scum and blood from the bones, turkey neck bones are usually much cleaner and therefore, when boiled, releases very little scum to the broth. You will occasionally need to skim the surface of the broth to remove the small amounts of scum that rises to the top. This is normal and when done right, ensures a clear, rich tasting turkey pho broth. 
  • 3. Prepare the Pho Noodles:   In a separate smaller pot, bring 2 cups of water to a boil. Working in batches, place fresh or dry pho noodles in boiling water for 1-2 minutes, or until it softens to your liking. Set aside and portion into individual bowls.
  • NOTE:  If you are using dry rice noodles, you will need to soak it in warm water for at least 30 minutes to soften it before boiling it. If you are using fresh noodles, you can skip this step if you feel that the soft texture is already to your preference. 
  • 4. Optional in lieu of noodles if you are carb-conscious: Soak glass vermicelli noodles in warm water for 20 minutes. It will be somewhat al-dente until you ladle the broth over it. 
  • 5. Prepare to Serve the Pho:  Once you're ready to serve, bring the broth to a rolling boil. Fill each bowl with your desired portion of pho noodles, meat balls, chicken breast meat, and fresh herb condiments. Ladle heaping spoonfuls of boiling broth atop each bowl. Garnish bowls with extra herbs, sauces, and condiments. Serve immediately and Enjoy!

Happy Lunar New Year!

posted on: Thursday, January 30, 2014

We're off to pass out red envelopes to the kiddies, but cheers to a fabulous day of feasting and family for all my readers celebrating Lunar New Year, the Year of the Horse. And in case you're curious about what's in the stars for you this year, here's a fun article for your reading pleasure. 

Happy Lunar New Year | Year of the Horse | Chinese Lanterns | via Chandara Creative
Chinese lanterns gracing a Beijing teahouse | via Chandara Creative

Deep-Fried Chicken Wings with Thai Pickled Cucumber Relish

posted on: Wednesday, January 29, 2014

Deep-Fried Chicken Wings with Thai Pickled Cucumber Relish | via Chandara Creative

Whether you're gearing up to root on your favorite team for Super Bowl Sunday, or ringing in Lunar New Year this weekend, my version of these deep-fried chicken wings will definitely get you a standing ovation. I first crafted this recipe for my baby shower (yes, I did some cooking at my own shower, but hey, you should have already known I'd pull something like this), and my guests were licking their fingers. Perfectly seasoned and fried to a golden brown hue, I know it'll pair perfectly with that ice cold bottle of beer (or mocktail, in my case) and a side of freshly pickled Thai cucumber relish (recipe to follow). Dip your wings in a sweet chili or hot sauce of your choice, and no matter what you're celebrating this weekend, I'm going to bet that you'll leave a lasting impression on your guests. Enjoy! 


Homemade PIckled Thai Cucumber Relish | via Chandara Creative
Mae Ploy Sweet Chili Dipping Sauce and Homemade PIckled Thai Cucumber Relish | via Chandara Creative
Deep-Fried Chicken Wings with Thai Pickled Cucumber Relish | via Chandara Creative


Deep-Fried Chicken Wings with Thai Pickled Cucumber Relish
Serves 4-6

Ingredients 
• 2 lbs (about 12-15) chicken wings, cleaned & sectioned 
• 2 tsp seasoned salt, preferably Lawry's 
• 2 tsp garlic salt
• 2 tsp garlic powder
• 2 tsp onion powder
• 1 tsp paprika
• 1 tsp black pepper 
• 3 tbs fish sauce
• 2 tbs oyster sauce
• Vegetable oil for frying

  • Instructions:
  • 1. Put your chicken wings in a large mixing bowl, and sprinkle all the seasoning ingredients over them. Mix well, making sure you rub each wing generously with the marinade. Cover and refrigerate for at least 2 hours to allow the marinade to fully season your chicken. 
  • 2.  Heat a large pot with vegetable oil over medium high heat to a frying temperature of 350°F Once oil is heated to proper temperature, fry the chicken wings in small batches for 6-8 minutes each, or until wings turn a nice golden brown color. Transfer cooked wings to a plate lined with a paper towel. Allow the oil to return back to 350°F and continue frying the rest of the wings.
  • 3. Serve the wings with Mae Ploy sweet chili dipping sauce and a side of Thai pickled cucumber relish (recipe below) . 
Ingredients - Thai Pickled Cucumber Relish
• 1/2 cup water
• 1/2 cup rice vinegar
• 1/2 tsp salt
• 3 tbs sugar
• 2 small cucumbers, Persian or Japanese variety (otherwise, use 1/2 English cucumber), diced
• 1/4 red onion or 1 medium scallion, diced
• Optional: 1-2 Thai birdseye chili, minced

  • Instructions:
  • 1. Prepare the brine: In a small sauce pan, heat the water, vinegar, salt, and sugar mixture. Bring to a boil, and turn off heat. Allow brine to cool and set aside. 
  • 2. Mix the cucumber, onion/scallion, and chili in a glass bowl or jar. Pour the cooled brine over the fresh ingredients and let cool. Once cooled to room temperature, chill in refrigerator for at least 30 minutes and it will be ready to use as a condiment. 
  • NOTE:  You can prepare this relish 1-2 days ahead of time and store in your refrigerator for use.

Mocktail Monday: Meyer Collins

posted on: Monday, January 27, 2014

When it comes to memorable cocktails, I've always been a huge fan of hand-crafted libations where half the time you spend drinking the liquid concoction, you actually trick yourself into thinking you're doing something good for your liver. I guess this is where mocktails can truly shine because it's my grown-up version of juicing, if you will. This week for Mocktail Monday, allow me to indulge you with my version of the classic Tom Collins, or what I like to refer to as my Meyer Collins Mocktail.

Meyer Collins Mocktail | via Chandara Creative

This drink is inspired from my hey days lounging with some girl friends at a local jazz club in San Francisco's Upper Haight neighborhood, namely, Club Deluxe. This was post college, so imagine my reaction when I heard of the club's name, which brought me back to those college clubbing days when girls don their skimpiest outfits and wait in lines that snake around the block only to have their buns freezing for hours before entering a dirty dark nightclub where the music is being blasted so loud that you can never expect to hold a decent conversation, much less get a decent drink that doesn't taste like watered-down cough syrup.

On the contrary, Club Deluxe is a neighborhood jazz lounge where you can sway to the rhythm  of soothing live jazz music from local artists, and nosh on artisanal pizzas, all while sipping a highball glass of their house-crafted Spa Collins, a refreshing libation oozing with the spicy sweetness of ginger syrup, the cooling flavors of fresh cucumbers, the tartness of lime, and an herbal infusion of freshly muddled mint sprigs. While I haven't been back in quite some time and frankly, never really knew the actual makeup of this drink, my tastebuds can still recall the flavors so vividly. So, when my good friend and purveyor of meyer lemons decided to pay me a visit this past week, I couldn't resist the urge to share it with you. My version is aptly named the Meyer Collins, and it's my tribute to this season of abundant citrus. Cheers!

Meyer Collins Mocktail | via Chandara Creative

Meyer Collins Mocktail | via Chandara Creative

Meyer Collins Mocktail | via Chandara Creative

Meyer Collins Mocktail
Inspired by the Spa Collins of Club Deluxe, San Francisco
Serves 2

Ingredients
• 12 fresh mint leaves
• 2 tbs ginger simple syrup (recipe below)
• 1.5 oz or 1 shot glass fresh meyer lemon juice 
• 1.5 oz or 1 shot glass fresh orange juice
• 3 slices cucumber
• Club soda or sparkling water
• Ice, cubed & crushed
• Garnish with extra cucumber slice, mint sprig, and/or lemon wedge

Instructions
1. Muddle mint leaves and cucumber slices in the bottom of a glass.
2. Fill 2 glasses with ice cubes and add in meyer lemon juice, orange juice, and 1 tbs ginger simple syrup.
3. Stir gently, and top it off with a splash of sparkling water or club soda. Now, layer on the crushed ice and another 1 tbs of the ginger simple syrup.
4. Garnish with fresh mint sprig, cucumber slice, or lemon wedge and you're all set! Enjoy!

Ginger Simple Syrup Ingredients
• 1/2 cup water
• 1/2 cup granulated sugar
• 1 tbs ginger, peeled & chopped

Instructions
1. In a small sauce pan, stir together the water and sugar and bring to a boil under medium high heat.
2. Once sugar dissolves, remove from heat and mix in the ginger. Allow ginger to steep in syrup for 10-15 minutes.
3. Strain out the ginger, and allow syrup to cool to room temperature.  Transfer to a glass container and store in the fridge.

Cold + Flu Remedy: Ginger Tea with Honey and Lemon

posted on: Sunday, January 26, 2014

It's that time of year again--the time of year when a few pesky visitors come lurking around every corner and no matter where you turn, somebody's bound to catch wind of them. Yes, Old Man Winter brings his buddies, cold + flu, to pay you a visit, which usually means they're unannounced and will probably end up overstaying their welcome (not that they were even welcome in the first place). But lucky for you, I have an age-old remedy that I've been using for years whenever this trio enters my home: Ginger Tea with Honey and Lemon. 


Ginger Tea with Honey & Lemon | via Chandara Creative
Let me just preface this post by saying that I love ginger. Love it! Our kitchen is always stocked with this herb and I use it in many of my dishes. Its therapeutic healing properties are bar none, ranging from being used to treat nausea (ahem, morning sickness), digestive issues, stomach upsets, and yes, even your common cold and flu symptoms. Whenever I feel a cold coming on, which is usually marked by that dry, scratchy sore throat feeling, the first thing I do is start foraging my fridge for a piece of ginger root.

It's also usually around this time of year that my good friend comes toting bags of fresh meyer lemons from her backyard, and it's one of the reasons why I vowed to be her friend for..like...ever! Just kidding. I'd be her friend with or without her tree, but for now, let's just say I'm quite fond of our friendship. From there, I brew my pot of ginger tea, let it steep, and squeeze in a wedge of lemon with a dollop of honey. This is as easy as it gets, folks. If you steep it properly, the ginger tea alone will have a spicy sensation as it goes down your throat. The acid from the lemon helps cut it as well as the sweetness from the honey. All in all, it's a great combo, but most importantly, it works! After a day or two of drinking this, you'll notice that your throat will feel much better! But hey, I'm no medical expert, so I guess my post should also include a disclaimer about consulting with your medical practitioner if your condition worsens and yadda yadda. There ya have it. Either way, I hope you'll give this a try and if you have any of your own home remedies to recommend, I'd love to hear it. Until then, stay healthy and hydrated. Your body really is your sanctuary, so taking care of it should definitely be a priority.

Meyer Lemon | via Chandara Creative
Get your Vitamin C boost from a squeeze of fresh meyer lemon
How to peel ginger without a knife | via Chandara Creative
Easiest way to peel ginger without a knife: Use a metal spoon to scrape off the outer layer of the ginger root. Ta-dah!

Ginger Root | via Chandara Creative

Ginger Tea with Honey & Lemon | via Chandara Creative
Silly but true: I enjoy squeezing my honey out of these little honey bears

Ginger Tea with Honey + Lemon
Makes 1 pot

Ingredients 
• 1 small fresh ginger root, peeled & thinly sliced or grated
• 1 lemon, sliced into wedges
• Honey
• 3-4 cups water

  • Instructions:
  • 1. Peel ginger using a metal spoon (see image + tip above) and thinly slice or grate. Fill a tea kettle or pot with 3-4 cups water and add in all the ginger. Bring pot to a boil, then simmer on lowest heat setting for 10 minutes to allow ginger root to steep & infuse the tea. Turn off heat, and strain out ginger.
  • 2.  In your teacup, spoon in 1 tsp of honey (or more based on your preference), squeeze in juice from a lemon wedge, and pour in your ginger tea. Stir gently and enjoy immediately when it's piping hot. 

Chandara Creative All rights reserved © Blog Milk Powered by Blogger